
How to Upload File to Google Cloud Storage Using Reactjs?
To know complete information on how to upload a file to Google Cloud Storage using ReactJS? In today’s digital age, storing and sharing files safely is crucial for web apps. Designers often need a flexible storage solution for various projects.
This includes building an e-commerce site, a photo-sharing platform, or a project dashboard. Google Cloud Storage (GCS) is a reliable cloud storage platform. It provides secure, flexible, and highly available object storage.
When used with ReactJS, a popular frontend system, engineers can build advanced file transfer systems easily. This article explains how to upload a file to Google Cloud Storage with ReactJS. It covers the setup, verification, best practices, and test code.
Why Choose Google Cloud Storage Using Reactjs?
Before plunging into execution, let’s get it why designers incline toward GCS:
Scalability – Can handle millions of records with ease.
Security – Offers granular authorizations by means of IAM parts and marked URLs.
Global Get to – Records can be gotten to around the world with moo latency.
Cost-effective – Pay as it were for capacity and transmission capacity used.
Integrations – Works well with Firebase, BigQuery, and Google AI tools.
Related Article: How to Access Google Cloud Console Terminal From Local Mac?
Prerequisites
To take after along, guarantee you have:
- Node.js and npm/yarn installed.
- ReactJS extend set up (utilizing create-react-app or Vite).
- Google Cloud account with charging enabled.
- A Google Cloud Capacity bucket created.
Basic understanding of Respond snares and JavaScript async/await.
Step 1: Make a Google Cloud Capacity Bucket
Log in to Google Cloud Console.
Navigate to Cloud Capacity → Buckets.
Click Make bucket.
Enter a interesting bucket name.
Choose Locale near to your users.
Select a capacity course (Standard for most apps).
Set get to control:
For generation, utilize Fine-grained IAM permissions.
For testing, you can empower Uniform access.
Click Create.
Now, your bucket is prepared to acknowledge uploads.
Step 2: Set Up Confirmation with Benefit Account
For secure transfers, you require credentials.
In Google Cloud Support, go to IAM & Admin → Benefit Accounts.
Click Make Benefit Account.
Assign roles:
Storage Admin (full get to) for development.
For generation, utilize restricted parts like Capacity Protest Creator.
Generate a JSON key record and download it.
Never uncover this JSON record straightforwardly in your frontend Respond app—it ought to remain on your backend.
Step 3: Utilize Marked URLs for Secure Uploads
Directly uncovering qualifications in Respond is hazardous. Instep, utilize marked URLs:
A marked URL is a short-lived interface produced by your backend.
Related Article: Google VPS Cloud: Transforming Your Digital Infrastructure
The frontend can utilize this connect to transfer a record specifically to GCS.
This guarantees your benefit account qualifications stay secure.
Step 4: Backend Setup for Marked URL (Node.js Example)
Create a basic backend utilizing Express and @google-cloud/storage:
// backend/index.js
import express from "express";
import { Storage } from "@google-cloud/storage";
import cors from "cors";
const app = express();
app.use(cors());
app.use(express.json());
// Initialize Google Cloud Storage
const storage = new Storage({ keyFilename: "service-account.json" });
const bucket = storage.bucket("your-bucket-name");
// API to generate signed URL
app.post("/generate-signed-url", async (req, res) => {
try {
const { fileName, contentType } = req.body;
const file = bucket.file(fileName);
const [url] = await file.getSignedUrl({
version: "v4",
action: "write",
expires: Date.now() + 15 * 60 * 1000, // 15 minutes
contentType: contentType,
});
res.json({ url });
} catch (error) {
console.error("Error generating signed URL:", error);
res.status(500).send("Error generating signed URL");
}
});
app.listen(5000, () => {
console.log("Server running on http://localhost:5000");
});
So, How to Upload File to Google Cloud Storage Using Reactjs?
I worked on a craftsmanship portfolio web app. My task was to upload pictures to Google Firebase Cloud Storage. This was fundamental to the web application. After all, what is craftsmanship without pictures? Firebase Cloud Storage makes a difference a client effectively transferring their pictures.
I used Firebase's Realtime Database to save the area of the main picture. When my client chooses a picture, it shows several images using react-responsive-carousel.
In future posts, I will go over how to set up the responsive carousel along with apathetic picture stacking. For this post, I will center on, as it were, the activity of uploading a file to Google Cloud Storage Node.js. The following is the way my Realtime Database is structured.
I have a key esteem combine for pictures. This picture's key contains a URL and alt for my fundamental picture. When I create a craftsmanship picture, it reads the Google Firebase URL from this area for that specific image. To place the record in its folder, you need an "Art course." This serves as the folder title and matches the route (or slug) name.
When the client finishes the required sections, I upload the record using the FormFileInput component from react-bootstrap. When a registry includes the record, I call on handleFileChange. This is where I call off the work to perform the transfer task.
Understanding the Google Cloud Storage Using ReactJs
In this paragraph, do you want to complete information on how to upload a file to Google Cloud Storage? When the occasion of selecting the record is activated, at that point put it away in imageFile.
I set up a capacity reference using the envelope (artRoute) and add a child that contains the title from imageFile. Once I have the picture, I'll start compressing it. This makes it easy to view in the browser, as shown below:
I compressed the file for browser optimization. Sometimes, a 6MB file can take a long time to download. I utilized browser-image-compression to perform the compression. I need to use "expect" because the compression isn’t done at the same time. Once I finish, I’ll store the compressed record in "compressedFile." Now that I have it, I need to create a transfer assignment to upload it.
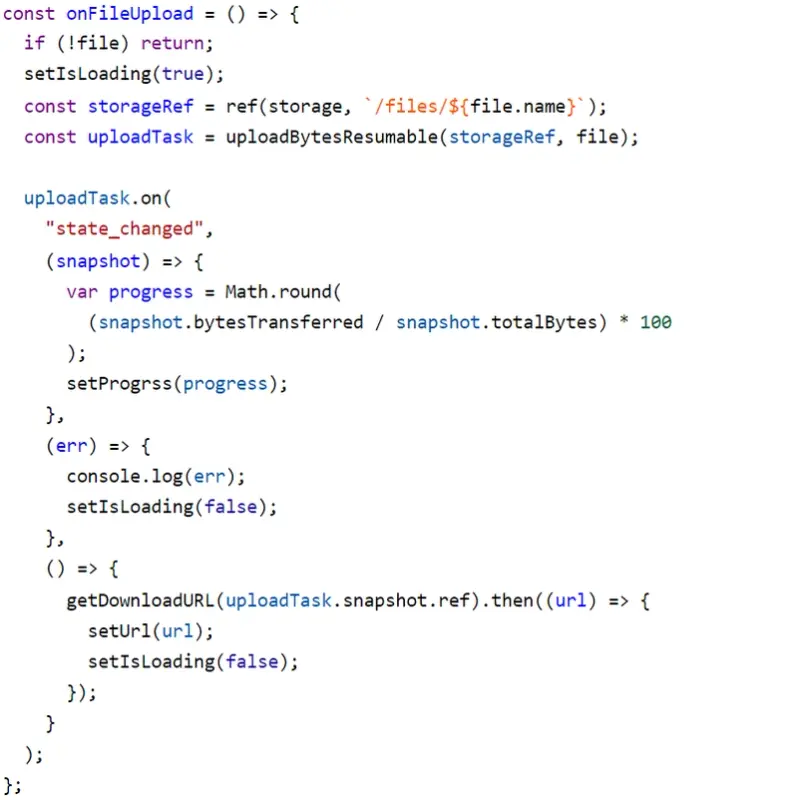
This code handles a transfer assignment. It transfers the record, tracks the transfer progress, and shows any errors. After the transfer, it also lets you create a task that acts like a guarantee.
For my illustration, I used a special bar. It starts dim with no transfer. Then, it turns blue to show transfer progress. Finally, when it's complete, it turns green. The status is followed by an advance bar made by React-Bootstrap. Here is the code underneath for the advance bar.
You Must Also Like: How Does the Google Cloud Function Work?
In this responsive Bootstrap component, variation permits you to select a color marker for the status. In this case, I utilized 'info' (blue) and 'success' (green). The "present" prop will appear in the visual advance. The name will essentially appear at the rate number as the advance is being made.
Looking at the transfer assignment code again, Firebase Capacity will update the transfer rate as the state changes. It does this by consistently retrieving the depiction. I make sure that the rate, as it were, appears with 2 decimal places.
If there is a mistake in the transfer, I support logging the blunder. If the record transfer is total, I set the transfer status to 'success' to show the client it has been completed. After the transfer is completed, I need to get the URL that was created and store it in the database.
Conclusion
Uploading a file to Google Cloud Storage with ReactJS is simple. Use marked URLs and a secure backend for clarity. Designers can create a secure, flexible, and user-friendly file transfer system by following this guide. If you're making a media-sharing app, an try dashboard, or a cloud service, this integration gives you fast and reliable storage for all types of files.