



How to Upload Files to Google Drive Desktop in Simple Steps?
The Google Drive desktop program changes everything about how you handle files. I have used it for three years across two laptops. It is not just a sync tool. It becomes a folder on your computer that mirrors your cloud storage.
You drag a file in, and it uploads. You delete something, and it vanishes from the cloud too. But most people mess up the setup. They pick the wrong mode.
They wonder why their hard drive is full. They lose files because they misunderstood how syncing works. Here is the honest, experience-based guide I wish I had when I started.
What the Google Drive Desktop Program Actually Does?
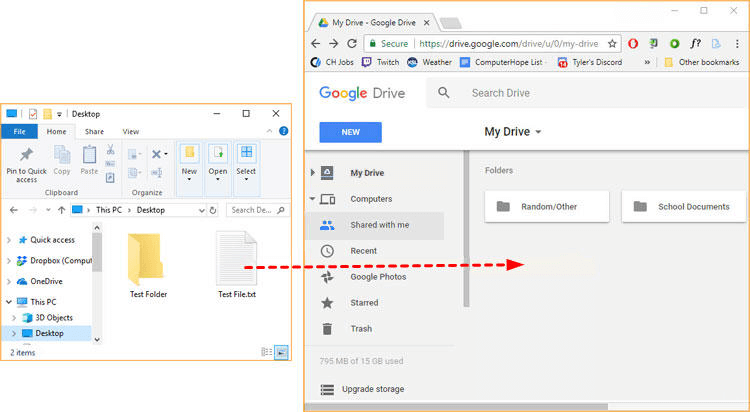
The Google Drive desktop program creates a virtual drive on your computer. On Windows, it shows up under “This PC” as a drive letter, usually G: On Mac, it lives in Finder. You open it like any other folder.
Read Also: How to Fix Google Drive Zipping File Stuck Issue Quickly (2026)
Here is the important part. Those files are not all stored on your computer by default. They live in the cloud. You see them. You can open them. But your hard drive only holds a placeholder until you actually need the file.
This is called streaming. Google made it the default for a reason. It saves space. Your 256GB laptop does not fill up with 100GB of Drive files you never touch.
But streaming has a catch. No internet means no access. Unless you specifically mark files as available offline. That is the trade-off nobody explains upfront.
How to Upload Files the Right Way?
You have two real options for getting files into Drive from your desktop.
Option one: Drag and drop. Open your Google Drive folder. Open the folder on your computer with the files you want. Drag them into the Google Drive window. Done. The upload starts automatically.
I use this method every day. It feels natural. It works exactly like moving files between folders on your own hard drive.
Option two: Copy and paste. This works too. Select your files, hit Ctrl+C, click inside the Google Drive folder, hit Ctrl+V. Same result.
The difference between these methods and the browser upload? Speed. The desktop program handles large files better. I have uploaded 4GB video files without the browser choking. Chrome would have crashed.
The Streaming vs Mirroring Decision That Trips Everyone Up
This is where people get confused. Google Drive desktop gives you two modes. You need to pick the right one.
You Must Also Like: How to Batch Scan Multiple Pages in Google Drive Android?
Streaming keeps files in the cloud. Your computer holds only what you open. This is what Google recommends for most people. It saves space.
Mirroring downloads everything to your computer. Every file. Every folder. Your hard drive holds a full copy of your entire Drive.
I made the mistake of mirroring once. My 512GB SSD filled up in two weeks. I had 400GB of Drive files I did not need locally. Bad idea.
Mirroring makes sense in one scenario. You need offline access to everything. You travel constantly. You work without reliable internet. If that is you, mirroring works. For everyone else, streaming is the smarter choice.
You can change this setting later. Click the Google Drive icon in your system tray. Go to Preferences. Find the Google Drive tab. Switch between Stream and Mirror.
How to Transfer Google Drive to Desktop Folder?
People search for “how to transfer Google Drive to desktop folder” constantly. They want a local copy. Here is how to do it without breaking anything.
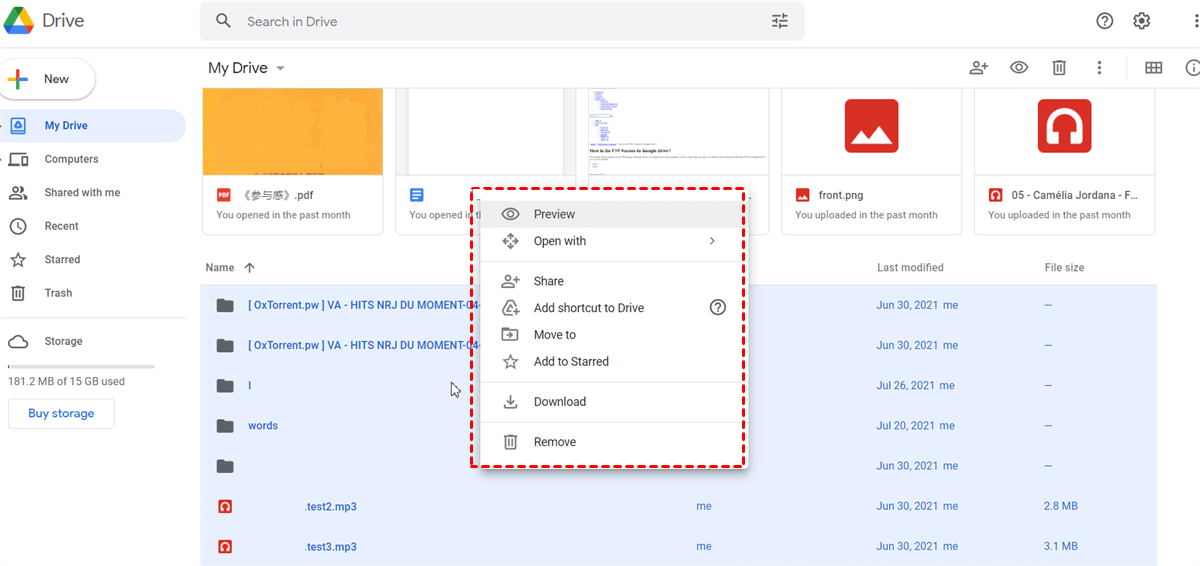
For individual files: Right-click the file in Google Drive. Choose “Download.” Pick your Desktop as the destination. It lands there.
For entire folders: Select the folder. Right-click. Download. Google zips it first. A folder with 200 photos becomes one.zip file. You extract it on your desktop.
For everything at once: This is where people go wrong. They try to download 50GB through the browser. It fails. Chrome times out. The zip file corrupts.
Use Google Takeout instead. It is Google’s official export tool. Go to takeout.google.com. Deselect everything except Drive. Choose your file format. Click export. Google emails you a download link when ready.
I exported 80GB of Drive files last year. Takeout took six hours to prepare. The download took another three hours. But it worked. No corrupted files. No frustration.
Why Your Uploads Might Be Failing?
I have seen this problem a dozen times. Someone drags files into Google Drive. Nothing happens. They try again. Still nothing.
Check your storage. Free accounts get 15GB. That includes Gmail and Photos. If your Drive is full, uploads fail silently.
Check the file type. Google Drive blocks certain file types. Executable files, some archives, encrypted files. They trigger security flags. The upload stops without a clear error.
Check your internet. This sounds obvious. But the desktop program sometimes disconnects without warning. Click the Drive icon. See if it says “Connected.” If not, restart the app.
Check for duplicate names. If you upload a file named “report.pdf” and one already exists, Google treats it as a revision. The old version disappears into version history . You can keep both. But you have to click “Keep both files” when prompted.
The Small Settings That Make a Big Difference
Google Drive desktop has hidden settings that change everything.
Turn on “Convert uploads.” Go to drive.google.com/drive/settings. Check the box for converting uploaded files to Google format. This turns Word docs into Google Docs automatically. It changes how you edit. Some people love it. Some hate it. I leave it off. I prefer keeping original formats .
Change your streaming location. By default, Google Drive mounts as a virtual drive. You can change it to a folder inside your user directory. Preferences > Google Drive > Change location. This matters if you use backup software that ignores virtual drives .
Mark folders for offline access. Right-click any folder in Google Drive. Choose “Available offline.” Now it downloads to your computer. This is how you get specific folders available without internet without mirroring everything.
What the Google Drive Desktop Program Does Not Do?
It does not back up your entire computer. That was the old Backup and Sync app. Google killed it. The new desktop program focuses on Drive files.
If you want to back up your Desktop, Documents, or Downloads folders to the cloud, you can. Go to Preferences. Find the “My Computer” tab. Add folders you want backed up. But this is separate from your Drive files. They appear under “Computers” in Drive. Not in “My Drive.”
It does not work perfectly with every file type. Large video files sometimes stall. Encrypted archives sometimes fail. AutoCAD files sometimes corrupt. Test with small files first if you work with unusual formats.
Who Should Use the Google Drive Desktop Program?
You should install it if you use Drive every day. The drag-and-drop workflow saves time. You stop opening browser tabs. Files become part of your normal file management.
You should skip it if you only use Drive occasionally. The browser works fine for occasional uploads. The desktop program adds complexity you do not need.
You should definitely use it if you collaborate on documents. Changes sync automatically. You see updates in seconds. No more downloading, editing, re-uploading.
You should avoid mirroring mode unless you have a specific reason. Streaming handles 95% of use cases. Mirroring creates more problems than it solves for most people.
The Google Drive desktop program is not perfect. It has quirks. The settings are buried. The streaming vs mirroring decision confuses everyone at first. But once you set it up correctly, it becomes invisible. Files move where you want them. Uploads happen in the background. You stop thinking about the cloud at all. That is the point.