How to Move Shared Folder to Another Drive With Permissions?
I learned this lesson staring at 40 angry coworkers. Three years ago, I needed to move a shared folder to a new drive. Simple copy-paste. Five minutes. Done. Wrong.
Monday morning arrived. Zero access. Every single person got "You do not have permission" errors. I spent six hours manually resetting rights for 40 people. Never again.
Here is the correct way to move shared folders to another drive while keeping every single permission intact. Windows copy-paste breaks permissions. Robocopy preserves them.
Let me show you exactly how.
Why Normal Copying Destroys Shared Drive Permissions?
You open File Explorer. Right-click. Copy. Paste to new drive.
Seems fine. Files appear. But here is what happened behind the scenes.
Read Also: How to Use Gemini AI to Organize Google Drive Folders Automatically?
The Shared Drive Permissions on that folder are tied to the original volume. When you paste using Windows Explorer, the folder inherits permissions from the destination drive. Your original permission settings disappear.
This happens because Windows treats copy-paste as "create new file" on the destination. New files get the parent folder's permissions. Not your carefully configured settings.
For anyone asking how to access a shared drive after a move gone wrong, the answer is: you cannot without manual fixes.
Microsoft's own documentation confirms this. Standard copy ignores ACLs (Access Control Lists). The file arrives. The permissions do not.
The Shared Drive Permissions must be explicitly told to move with the data.
The One Tool That Works: Robocopy
Microsoft built Robocopy (Robust File Copy) specifically for this task. It lives inside every Windows computer. You have never used it because Microsoft hides it in the command line.
Robocopy does what Explorer cannot. It copies every file attribute including NTFS permissions, ownership data, and timestamps. There is one critical distinction you must understand.
Windows folders have two separate permission systems:
NTFS permissions control who can read, write, modify, or delete files on the local disk. These live inside the file system.
Share permissions control who can access the folder over the network. These live in the Windows registry.
Robocopy handles NTFS permissions perfectly. But it cannot copy share permissions alone. For those, you need a second step.
Let me walk you through both.
Step 1: Copy Files with NTFS Permissions Using Robocopy
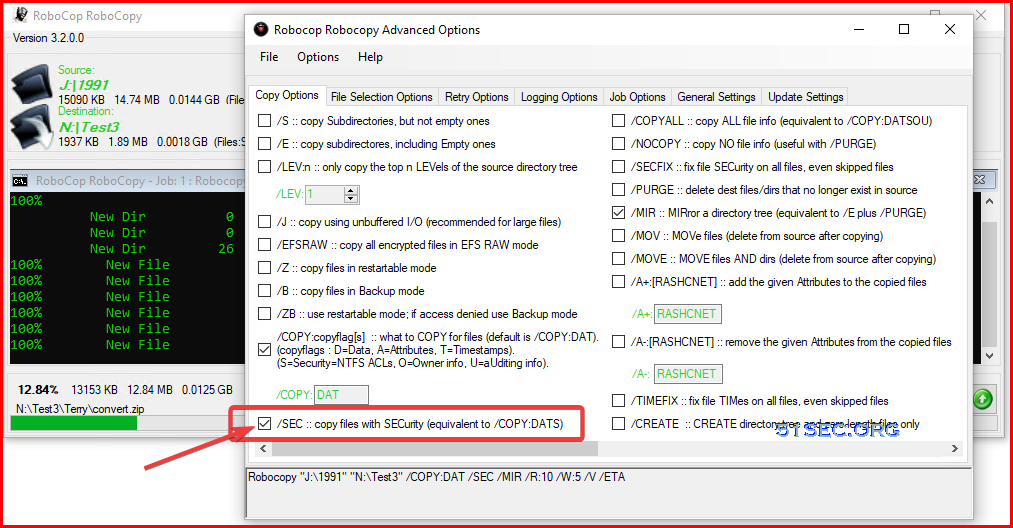
Open Command Prompt as Administrator. Search "cmd" in Windows. Right-click. Run as administrator. Here is the exact command I use:
cmd
robocopy "C:\SourceSharedFolder" "D:\DestinationSharedFolder" /COPYALL /MIR /R:5 /W:10
Let me explain what each part does.
| Parameter | What It Does |
|---|---|
/COPYALL |
Copies everything - file data, attributes, timestamps, NTFS permissions, ownership, and auditing info |
/MIR |
Mirrors the source to destination (deletes files in destination that no longer exist in source) |
/R:5 |
Retries 5 times if a file fails to copy |
/W:10 |
Waits 10 seconds between retries |
If you prefer a GUI tool instead of command line, FreeFileSync, SyncBack, and GS RichCopy 360 also work. But Robocopy is free, built-in, and reliable.
For files larger than 1GB, add the /Z parameter for restartable mode. If the copy interrupts, it picks up where it left off.
Important warning: The /MIR parameter mirrors the source to destination. This means any file in the destination that does not exist in the source gets deleted. Use this carefully. Double-check your source path before pressing Enter.
Step 2: Preserve Share Permissions Using Registry Backup
Robocopy handles NTFS permissions. But Shared Drive Permissions for network access live in a different place. Windows stores share definitions in the registry. Here is how to back them up before your move:
-
Press
Win + R, typeregedit, press Enter -
Navigate to:
HKEY_LOCAL_MACHINE\SYSTEM\CurrentControlSet\Services\LanmanServer\Shares -
Right-click the
Sharesfolder -
Select
Export -
Save the
.regfile to a safe location
This captures every shared folder definition including who accesses it over the network. After moving your files to the new drive, import this registry file on the destination machine:
-
Double-click the saved
.regfile -
Restart the
Serverservice or reboot your computer
Your share permissions are now restored exactly as they were.
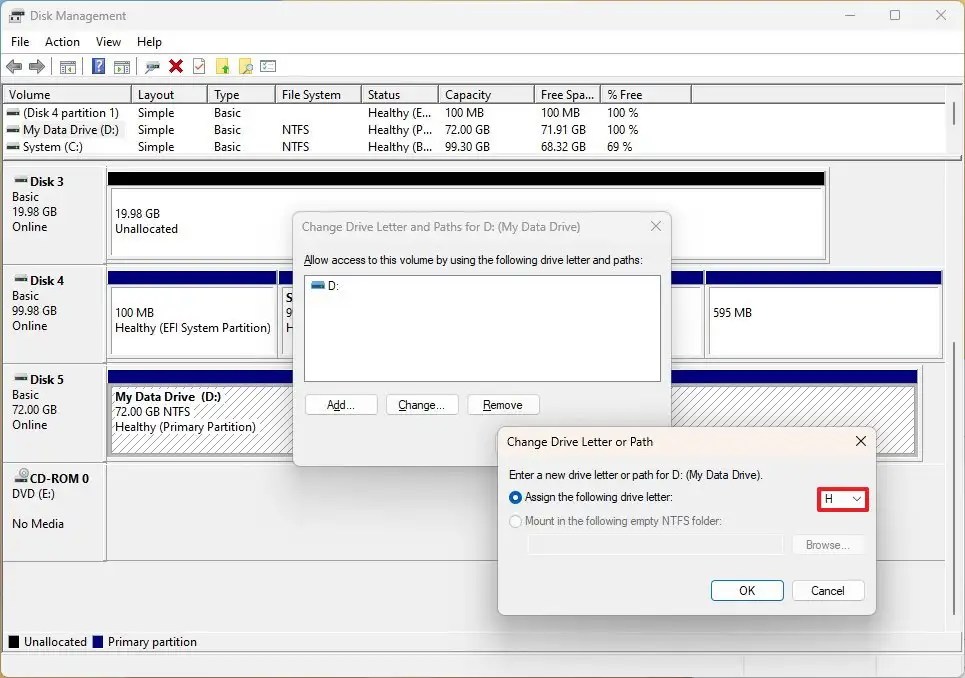
Step 3: Change the Drive Letter in the Shared Path
If you moved files from C: to D: but kept the same folder name, the registry still points to C: You need to update the path.
You Must Also Like: How to Make Excel Cells Expand to Fit Text Automatically?
Open Registry Editor again. Navigate to the same Shares key. Find your shared folder name in the right panel. Double-click it. Edit the Path line to reflect the new drive letter.
Example: Change Path=C:\SharedFolder to Path=D:\SharedFolder
Click OK. Close Registry Editor. Restart the Server service or reboot.
Your users now access the same network path. The files now live on the new drive. Permissions are untouched.
My users never noticed the move happened at all. That is the goal.
Alternative Method: ICACLS for Permission Backup
Some administrators prefer ICACLS for backing up NTFS permissions separately. To backup permissions to a text file:
cmd
icacls "C:\SharedFolder" /save "D:\Backup\SharedFolder_perms.txt" /T
The /T flag includes all subfolders and files .
To restore permissions from the backup:
cmd
icacls "C:\SharedFolder" /restore "D:\Backup\SharedFolder_perms.txt"
This method gives you a readable permission backup you can inspect before restoring. I use this when migrating between completely different servers where registry export might fail.
But for simple drive-to-drive moves on the same machine, Robocopy plus registry export is simpler and faster.
Special Rule for Google Shared Drives
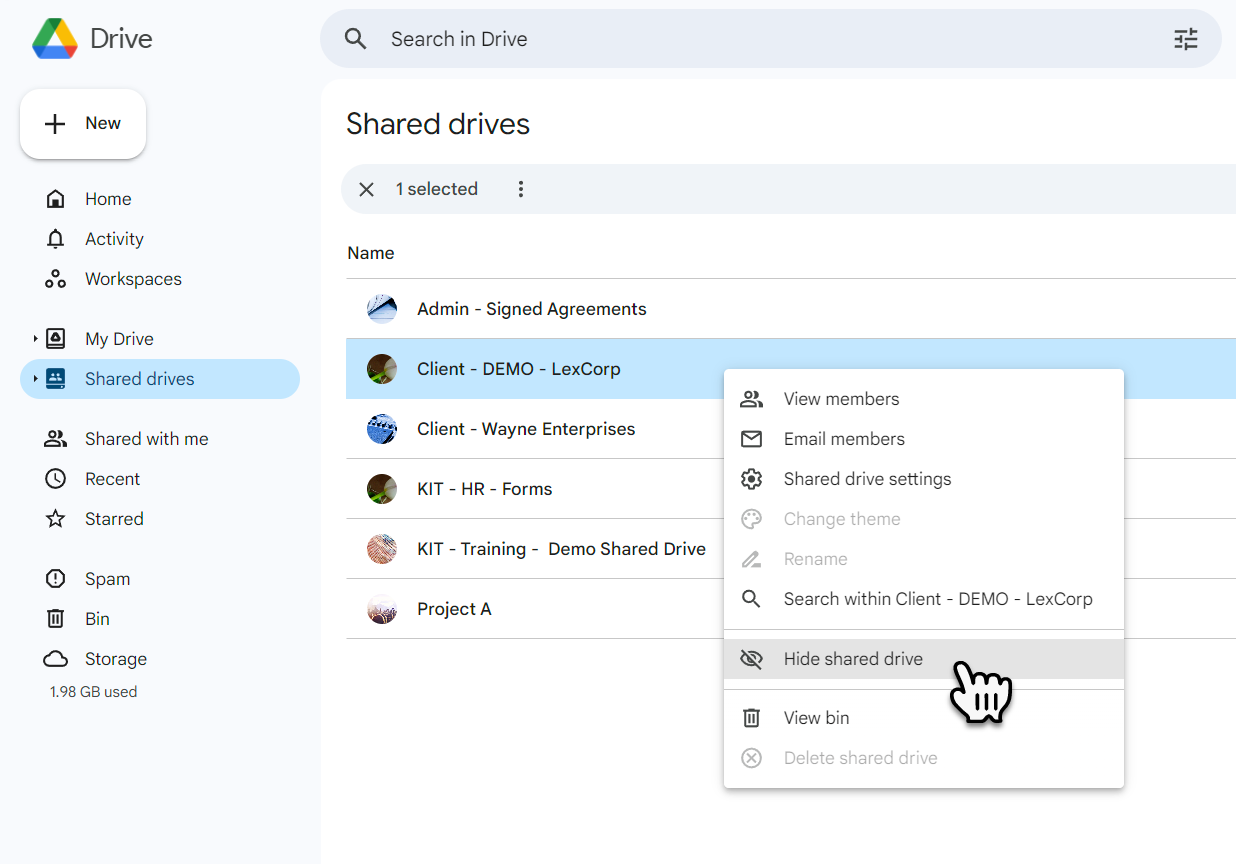
If you use Google Drive instead of Windows file shares, the rules change completely. Google Shared Drive Permissions operate differently:
Files belong to the team, not an individual. Permissions are strictly expansive. A user cannot have their access reduced in a subfolder if they have higher access at the parent level.
Here is the big limitation. Google Drive share permissions cannot be directly copied to a new location using command-line tools. Users have two permission types in Google Shared Drives:
-
Member permissions – granted at the shared drive level
-
File access permissions – granted to specific files or folders
When a user is removed as a member, all their individual file permissions also get revoked automatically.
To migrate Google Shared Drives while preserving permissions, you need Google Workspace's native transfer tools or third-party migration software. Google's API does not allow direct permission cloning between shared drives.
For simple use, create a new shared drive. Add members with the same roles. Move files using the web interface. Permissions stay intact because the files remain within Google's system throughout the process.
FAQ's- How to Access a Shared Drive
How do I access a shared drive after moving it?
Users access the same network path as before. The path does not change. Only the physical drive location changes. If users cannot access after the move, check the Server service is restarted or the computer is rebooted.
Does Windows copy permissions when dragging and dropping?
No. Standard copy-paste and drag-drop in File Explorer ignore NTFS permissions. The copied file inherits destination folder permissions. This is why Robocopy is necessary.
Can I copy shared folders between different Windows versions?
Yes. Robocopy works across Windows 10, Windows 11, and Windows Server editions. The registry export method also works across versions. Test on a small folder first to confirm compatibility.
What about hidden or system folders?
Robocopy with /MIR copies all subfolders including empty ones. Hidden and system folders are included. No special flags needed.
Mistakes I Made So You Do Not Have To
1: Using Cut-Paste instead of Copy
Cut-paste deletes the source during the operation. If the transfer fails, your data is gone. Always copy first using Robocopy. Verify the copy succeeds. Then delete the original.
2: Forgetting the Registry Export
I moved files correctly. But I did not export share permissions. Users saw the files but could not open them over the network. The NTFS permissions were correct. The share permissions were missing.
3: Moving Files That Were Open by Users
Backing up files currently in use leads to incomplete copies. Schedule the move during off-hours. Or use Robocopy with /ZB which switches to backup mode when access is denied.
4: Not Testing Permissions Before Deleting Source
After the move, I should have tested user access from another computer. I assumed everything worked. It did not. Test first. Delete second.
Complete Migration Command Set
Here is my complete sequence for moving a shared folder from C: to D: with full permissions preserved.
Step 1: Export share permissions from registry
cmd
reg export HKLM\SYSTEM\CurrentControlSet\Services\LanmanServer\Shares C:\Temp\share_backup.reg
Step 2: Copy files with NTFS permissions using Robocopy
cmd
robocopy "C:\SharedFolder" "D:\SharedFolder" /COPYALL /MIR /R:5 /W:10
Step 3: Verify the copy succeeded. Check file counts and sizes.
Step 4: Import share permissions on destination (if different machine)
cmd
reg import C:\Temp\share_backup.reg
Step 5: Update path in registry if drive letter changed. Navigate to Shares key. Edit the Path value for your shared folder.
Step 6: Restart Server service or reboot
cmd
net stop Server && net start Server
Step 7: Test access from another computer before deleting original.
Step 8: Delete original folder only after confirming everything works.
When to Use Other Methods?
The Robocopy and registry method works for most Windows scenarios. But here are exceptions.
For Google Shared Drives: Use Google Workspace native tools. Command-line copy does not preserve Google's permission model.
For cross-domain migrations: Use Microsoft's File Server Migration Toolkit. Registry export between domains causes permission mismatches.
For individual file moves within same drive: Cut-paste preserves permissions because the file never leaves the NTFS volume. Copy-paste breaks permissions. Use cut-paste when staying on same drive. Use Robocopy when changing drives.
For OneDrive or SharePoint: Use Microsoft's migration tools. The registry export method does not apply to cloud storage.
The Final Thoughts
Moving shared folders with permissions intact is not complicated. But you must use the right tools. Windows Explorer fails silently. Robocopy succeeds. Here is your checklist:
-
Open Command Prompt as Administrator
-
Run
robocopy "source" "destination" /COPYALL /MIR -
Export registry key
LanmanServer\Shares -
Import registry key on destination
-
Update path in registry if drive letter changed
-
Restart Server service
-
Test from another computer
-
Delete original
Follow these steps. Your users will never know the files moved. No angry Monday emails. No six-hour permission resets.
I learned this the hard way so you do not have to.